This quote floats around my head quite a bit. History is filled with stories of hard nosed-people replacing their more decadent, softer brethren. Don't believe me? Ask Louis XVI.
This lame joke goes out to the history buffs
Just kidding. To me this quote is less about fomenting revolution and more a reminder to myself that toughness is a virtue. If we're honest with ourselves, we can admit that we live in the most comfortable candy coated soft and sweet time in the history of man. Twenty-three hours of your day are filled with air-conditioning and cushions. You could take one hour to get a little uncomfortable, right?
Yes, exercise is challenging, but that's relative to the rest of your life. Do you think your great-great grandpappy who grew up on a farm and stormed the beach at Normandy would find your Zumba class challenging?
I don't bring this up to put anyone down, I bring it up as a reality check. While infomercials and fad diets play charlatan to the silk slippered masses, Resolve and Discipline are fitting the accomplished with wooden shoes.
So get hiking, and don't forget to wear your fitbit.
- Any lower body exercise executed on one foot. So yes, the Crane Kick applies.
Why should I care?
- Moving on one leg is beneficial for the same reasons as split stance exercises, and generally requires a lot more stability. Stable ankles, hips, and knees tend to be less prone to boo-boos making me a big fan of single leg variations for people prone to knee valgus.
- Single leg exercises are about precision. Start with the single leg RDL and focus on keeping your chest and hips square to the floor while loading your hamstrings. How do you load your hamstrings? Well, the lightbulb went off in my head when I watched this clip from Dan John. Tune to 3:40 for the goodies.
Cues
- Establish a tripod foot and get rooted (for some that means "screwing" their foot into the floor and for others it means trying to grab the floor with their foot)
- Push your hips back to load your hamstrings
- As the hip pushes back the trailing leg should rise in harmony with the head as it lowers.
- Pull your hips back under you to return to a standing position.
This is a difficult exercise to do well. Start with this awesome drill from Tony Gentilcore...
Master that and then trade the foam roller for a barbell, dumbbell, kettlebell, or a landmine like below...
What is it?
- Split Stance movements are lunge variations and step up variations.
Why should I care?
- Split stance movements allow you to simultaneously train lower body strength and stability, which are great qualities to have if you're not quite ready to commit to Life Alert. Lucky for you split stance work starts somewhere familiar, the 90/90 position(Half Kneeling).
Remember me?
The Split Squat is our tier one split stance movement. Mastering this will allow you to easily transition to higher tier split stance variations.
How?
- For beginners its best to start from the 90/90 position and then rise by pressing through the front foot. Soon you'll be able to start from the top and descend into the 90/90 like I did in the video. Also, if you're doing well getting into the position, you may feel a stretch down the quad of the trailing leg.
Cues
- Assume the 90/90 position, aligning the knee and ankle under the hip
- Squeeze the glute on the side of the down knee
- Make sure you can feel your entire tripod foot in front and press the floor away
- Descend and return your knee to the starting position on the floor
Once you have the split squat down, you can attempt other split stance variations like the...
- Reverse Lunge
Thus far we've primarily focused on bilateral(two limb) strength exercises, and core stability exercises. Now, assuming you've mastered the prior movements, its time to marry Strength and Stability with unilateral(one limb) movements.
What is it?
- Unilateral exercises are those where one limb is responsible for driving the exercise. The landmine press, lunges, high fives are all unilateral.
Unilateral Grip Strength Training in Predator(1987)
Why should I care?
- Unilateral exercises give you an opportunity to iron out asymmetries. Trade squats for split squats and you'll likely be surprised how much stronger or stable one leg feels. Even the best training programs can't account for the extra reps acquired by using our dominant arm and leg in daily life.
- Unilateral exercises also allow you to continue training aggressively without loading your spine aggressively.
- Unilateral exercises are HIGH TIER CORE exercises. One limb produces the movement while the rest of the body provides stability. Remember the Landmine Press? One arm presses and the rest of the body busies itself resisting rotation, flexion and extension. Killing four birds with one lift.
The foot is the foundation of lower body training. Literally. That being the case, its a good idea when training to apply some specificity to what your feet are doing, and use an active or tripod foot.
What is it?
- The active or tripod foot is a reliable means of ensuring optimal foot position for squats, deadlifts, split squats, etc.
The active or tripod foot is the neutral foot
Why should I care?
- The devil is in the details they say. They also claim he's in Georgia. Sounds to me like the devil is in a salon in Georgia. That aside, errors in execution are often due to lack of specificity. If your feet aren't aligned they'll feed that misalignment back up the chain to your knees, hips, and beyond.
Cues
- With shoes off, establish firm connection between your heels and the floor
- While maintaining contact through your heel, press the ball of your foot into the floor
- Next press the ball of your pinky toes into the floor, keeping contact with the heel and other ball
- Finish by tightening your glutes (think screwing into the floor)
After that last post I wanted to take an opportunity to cut through the stench of any self-righteousness you may have read into and make clear I STILL HAVE A LOT TO LEARN. In fact a major reason behind developing this blog, in addition to being a service to my clientele, has been to document my understanding of things related to fitness.
By writing down my current understanding of concepts and movements I'm exposed to anyone who comes across this blog and to myself. I don't have enough fingers and toes to count the number of times I have watched a video of myself demonstrating an exercise only to realize how poorly I performed.
"Didn't this idiot just get done telling us how important it is to stack the hip over the knee?"
Many of these videos were taken a long time ago and my understanding of some movements has developed since then.
"Where's that reach at the top you think is so important, Trev?"
That being the case I plan on reshooting many of the videos and using the old ones to juxtapose my developing thoughts on movements against my previous understanding. I will however point out that I don't consider any of these errors in movement to be dangerous and thats whats most important. I don't move perfectly and I don't expect you to. We're all built differently and carry with us our own asymmetries, making perfect movement an impossibility. Impossible is a friggin' awesome goal though. You know, shooting for the moon and all that.
That Einstein was a wicked smart dude. This idea seems obvious, but the genius comes with application. Nothing about your health or well being will improve until you take action and make it happen.
After several years of training I've noticed the most significant obstacle standing the in the way of a client's improvement is taking that initial step towards the gym. If you don't show up, I cannot help you. Pay me all you want, but fitness is something you can't buy. For some that may be unwelcome news, but not for me.
The beauty of the gym is that it's one of the only meritocracies I know of. You can't inherit fitness, your parents can't buy it for you, it does't matter who you are and who you know. In fitness, the only thing that matters is your effort and your plan. Lucky for you, I take care of the plan. The effort is up to you. Show up and give a 10 and you'll get a 10, give a 6 and get a 6. Don't show up and decay. I'm sure you've got a good excuse...like this guy.
I realize that working out is not everyone's idea of a good time, but I think we can agree that it is necessary and beneficial. Kinda like brushing your teeth. Do you have to work yourself into a frenzy to clean yourself? No...I hope. You realize it is necessary and good for you, so you do it. Its a part of your routine. So why not look at exercise in the same light.
Herculean efforts in the gym every two months can't hold a candle to the effectiveness of regular visits to the gym, regardless of how modest the exercise might be. Consistency is key.
I don't always enjoy working out. For me those days are "punch the clock" days. I show up, do the work, and leave. Keep this in mind the next time sloth comes calling.
As I alluded to in the previous post, this post is all about the "Half Kneeling" or 90/90 position. So take a knee while I explain the value of this position and why so much of our training occurs here.
Half kneeling offers a lot to our training. It...
- trains stability through our hips. Something you'll find useful when doing split stance or single leg exercises. Also useful when you don't want to fall down and feel dumb.
- combines a stretch of the hip flexors with exercise, making more effective use of your time. Many of us sit for the majority of our day, and as a result our hip flexors are very tight. A proper half kneeling position with the glute of the down knee engaged can go a long way to correct this imbalance.
- utilizes fewer joints offering greater training specificity. If we are doing a half kneeling exercise, you can bet that stability is a major factor, as well as strength. By kneeling, we take joints like the ankle and knee out of the equation, allowing you to focus on pristine movement quality through your upper half.
The Set Up
- Kneel in a position that allows both legs to assume approximate 90 degree angles. I say approximate because for many this position will work better if they pull their front foot back a bit, allowing a slight angle of the shin. You should be able to feel all of the floor beneath your front foot.
- Now from a front view the joints of the lower body should be stacked. Stacked joints are happy joints! What we are looking for is the knee above the ankle and the hip behind the knee. From the front I shouldn't be able to see your back foot.
- Once good position has been established, your job is to maintain this position in spite of what your arms may be doing. Stability!
Common Errors
- Flexing the hip or failing to engage the glute of the down knee.
- Over extending at the hip. Instead keep your hip stacked over your knee, not your knee behind your hip.
- Hip Hike. Should you notice one hip seems to sit higher than the other in the half kneeling position, try to correct this yourself, but should that not work, another remedy is the elevate the down knee by adding extra padding.
Thoughts from smart folks on the half kneeling position...
What is it?
- The Landmine Press is an upper body pressing exercise involving a vertical press and one of the first unilateral exercises you're likely to run into while training with me.
Why should I care?
- Regardless of what Outkast would have you believe, throwing your hands in the air is something that deserves your care. As you're surely aware by now, maintaining neutral spine during an exercise is paramount to your success and well being. That being said, overhead pressing is an activity you have to earn the right to do. Many trainees don't initially possess the requisite mobility and stability needed to press overhead safely, and the landmine press, allowing for vertical pressing at a less severe angle, provides a great stepping stone for trainees looking to earn the right to press overhead in other exercises.
How to?
- Assume the 90/90 or Half Kneeling position(refer to the next post for a more nuanced look at this stance). With the end of the barbell near your shoulder, press it away from you and finish by reaching.
Cues
- Get in the 90/90(Half Kneeling) position by bracing and tightening the cheek of the down knee
- With the barbell just in front of your shoulder, press the weight away from you
- Finish the press with a slight reach
- Return to start position
The key here, and with all half kneeling exercises, is to limit extraneous movement. Brace tight and avoid rotating, flexing, or extending at the low back in an effort to move the weight. You know...maintain neutral spine.
Variations
- Half Kneeling Landmine Press
- Standing Landmine Press
Eventually we hope to transition the skills acquired with the landmine press to strict overhead pressing like here...
"I got you these...because your pull ups look like crap."
What is it?
- The Chin Up(palms facing toward you) and Pull Up(palms facing away) are upper body movements involving pulling in a vertical plane and they are the first of the foundational movements requiring you to stabilize through the core without the use of the floor.
Why should I care?
- Because if you're like me you spent most of Silence of The Lambs wondering, "Why doesn't she just climb out of the well?" Also, vertical pulling is another incredible way to strengthen the muscles of your back and provides a great strength benchmark for all trainees. I implore you all the put in the necessary work to achieve your first pull ups/chin ups. Maybe then The New York Times will stop publishing garbage like this: "Why Women Can't Do Pull Ups"
How to?
- Obviously the title of the exercise pretty much sums it up, but lets layer on a bit of specificity. For starters, I think the chin up is poorly named. Try thinking of these exercises as sternum ups. In an ideal world we could all pull our chests to the bar.
Secondly, the exercise, like all the others, ought to be performed with a neutral spine. Chin ups and pull ups rely primarily on your lats to produce the movement, and the harder the lats work the harder your abs(anterior core) have to work to keep you from extending at the low back...like this guy.
To be fair this video was made for the purpose of demonstrating poor form, so no one make fun of him! I can do it too!!!
For those interested in a detailed explanation of good Chin Up/Pull Up technique, here's Eric Cressey coming at you with all kinds of science...
For everyone else, think like a gymnast (i.e. toes in front of your nose).
Cues
- Grip the bar tightly overhead
- Brace the core by tightening glutes and stomach (i.e. toes in front of your nose)
- Pull elbows toward floor, finishing with chest on bar and elbows even with body
- Lower under control to starting position
Variations
- Chin Up (palms facing toward you)
- Pull Up (palms facing away)
For those of you wondering what happened to "toes in front of the nose", I had to modify it to "knees in front of the nose" because our chin up bar was made for wee folk and my feet hit the floor.
With all that being said, I'd like to point out that the Chin Up and Pull Up are movements that require a great deal of strength and core stability. For those of you working your way up to your first pull up, start with the Tall Kneeling Pulldown
This variation allows you to train the same movement while you acquire the requisite strength necessary to perform your first Pull Up/Chin Up.
Superbands provide another means of training the Pull Up/Chin Up while developing your strength.
- Band Assisted Chin Up
Finally, for all the ladies out there interested in making the NY Times eat crow, I refer you to Tony Gentilcore. No one fights on behalf of the strength of women quite like this dude.
This dude can squat. Regardless of the fact that the bar starts over head, then lies on his chest, and finishes on his back, each movement was a squat. Take away the bar and the major tenants of the squat remain.
What is it?
- The squat is a lower body movement involving maximal hip and knee flexion. In other words you're sitting down.
Why should I care?
- Do you ever sit? Of course you do. Do you ever stand? Well the latter half of the squat is likely how you got there. I realize this is likely coming off as patronizing but its only because I care. We all need to sit/crouch/hunker down at one time or another and learning to do so properly can spare your knees, hips, and low back.
How to?
Cues
- Begin by standing
- Assume a base slightly outside hip width
- Brace by engaging your glutes and abdomen
- Pull your butt toward the floor and return to standing by driving the floor away with your feet
- Finish by again engaging your glutes and abdomen in the braced position
As you saw above, there are a lot of different ways to squat and I think its great to want to do them all. That being said, I like to start clients with the goblet squat to a box. This variation keeps the weight in front allowing for a more vertical torso during the squat(aka a squattier squat) and the box provides a safety net as well as depth gauge.
Goblet Squat to Box
Once you're comfortable squatting to a box, you can remove it and move on to these other squat variations.
Assuming you've spent some time mastering the Tier 1 movements from earlier, its time to look at squatting as well as pressing and pulling in the vertical plane. As always we build these movements on the foundation of a neutral spine.
While there are tons of variations on upper body exercises, there is one factor that unifies them all...The Arrow.
First of all, a huge thank you to Mike Robertson who initially made me aware of this with the push up,
...but I noticed it as well in the chin up/pull up, the overhead press, and the row. While the paths of these exercises may vary, they all pass through this arrow position at one point or another.
Is this the only way to perform these exercises? Absolutely not. But for the novice lifter, I believe this set up provides a specific foundation on which to build.
What is it?
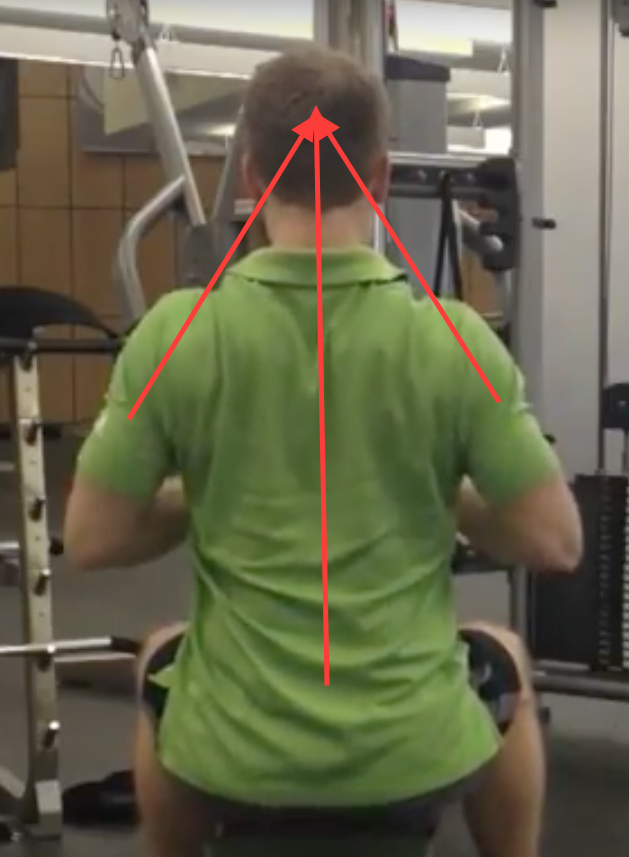
- Rowing is any kind of pulling done in the horizontal plane.
Why should I care?
- Given the nature of our modern lives, rowing is critical. We spend a significant amount of the day flexed at the spine over keyboards, cell phones, steering wheels, etc. Rowing gives us an opportunity to strengthen the muscles responsible for holding us upright.
How to?
- As always, neutral spine is key. If you were to freeze at any point in a rowing exercise and a PVC pipe were placed along your spine, would it make contact with the back of your head, between your shoulder blades, and just above your butt?
- Assuming you have established a neutral spine, all you need to focus on is drawing the weight toward you, stopping when your upper arm is inline with your body. Now, allow the weight to drift away from you, finishing when your shoulder blades glide apart. As with push ups, it is vital to allow your shoulder blades to pass through their complete range of motion.
Cues
- Begin by letting the weight lightly pull your shoulder blades apart
- Initiate the movement by drawing your elbows back and shoulder blades together
- Stop when your upper arm is inline with your body
- Lower weight to starting point where shoulder blades are being pulled apart
Variations
- Bent Over Row
- TRX Inverted Row
- Chest Supported Row
- Cable Horizontal Row
...and because sometimes its easiest to learn how not to do things, here is Eric Cressey on how to screw up a row.
What is it?
- I like to think of the push up as a plank(prone bridge) that moves up and down. This helps me to remember that the push up is first and foremost a core exercise...that also happens to make you wicked strong, dude. As always neutral spine should be constant throughout the push up(i.e. would a PVC pipe placed along your back make contact with head, between shoulder blades, and butt.)
If only this baby could talk...
He has so much to teach her.
Why should I care?
- The push up is a one stop shop for core stability, upper body strength, and it can be done ANYWHERE!
How to?
Cues
- Lie prone with hands beneath shoulders
- Brace the core in a neutral position and squeeze the glutes
- Press the floor away and finish by reaching(i.e. shoulder blades spread apart)
Although this sounds pretty simple, many people may initially lack the upper body strength necessary to perform a push up from their toes. Should that be the case, simply perform the same exercise on an elevated surface such as a bench, squat rack, dip bar...
or from the modified position on the floor.
or get a little help from a superband.
Finally, THE PUSH UP. (Note: I'd remind myself to finish with a stronger reach on these reps. What was I THINKING!?"
Once you've mastered the basic push up, try some other variations.